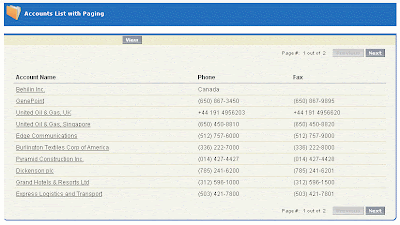
A while back I was working on a project in which I had to a design a
search interface for my Custom object. The search result could get
pretty big at times and I always needed to over come the limitations and
show large number of rows in the screen.
At that point I was like "gee if I could use Paging with the pageBlockTable tag" and then I decided to write it myself. So here is goes:
As we all know we should have two pieces of code, one for the Controller and the other is for the page tags.

The whole idea here is to create two lists on the controller object which one keeps the original records (all records) and the second one temporarily keeps only what should be shown to the user.
With defining a few parameters such as Total Pages, Current Page Number and Page size I managed to simulate paging successfully.
Here is what goes to the page:
<apex:page controller="MyPagingController" tabStyle="Account">
<apex:sectionHeader title="Accounts List with Paging"></apex:sectionHeader>
<apex:form >
<apex:pageBlock title="" id="pageBlock">
<apex:pageBlockButtons location="top">
<apex:commandButton value="View" action="{!ViewData}" id="theButton" rerender="pageBlock"></apex:commandButton>
</apex:pageBlockButtons>
<apex:pageMessages ></apex:pageMessages>
<div align="right" style="display:{!IF(NOT(ISNULL(accounts)),'block','none')}">
<font size="1pt">Page #: <apex:outputLabel value="{!PageNumber}"/> out of <apex:outputLabel value="{!totalPageNumber}"/> </font>
<apex:commandButton value="Previous" action="{!previousBtnClick}" disabled="{!previousButtonEnabled}" reRender="pageBlock"></apex:commandButton>
<apex:commandButton value="Next" action="{!nextBtnClick}" reRender="pageBlock" disabled="{!nextButtonDisabled}" ></apex:commandButton>
</div>
<br/><br/>
<apex:pageBlockTable value="{!accounts}" var="a" rendered="{!NOT(ISNULL(accounts))}" rows="{!PageSize}">
<apex:column >
<apex:facet name="header">Account Name</apex:facet>
<apex:outputLink value="/{!a.Id}" target="_blank">{!a.Name}</apex:outputLink>
</apex:column>
<apex:column value="{!a.Phone}"></apex:column>
<apex:column value="{!a.Fax}"></apex:column>
</apex:pageBlockTable>
<div align="right" style="display:{!IF(NOT(ISNULL(accounts)),'block','none')}">
<br/>
<font size="1pt">Page #: <apex:outputLabel value="{!PageNumber}"/> out of <apex:outputLabel value="{!totalPageNumber}"/> </font>
<apex:commandButton value="Previous" action="{!previousBtnClick}" disabled="{!previousButtonEnabled}" reRender="pageBlock"></apex:commandButton>
<apex:commandButton value="Next" action="{!nextBtnClick}" reRender="pageBlock" disabled="{!nextButtonDisabled}" ></apex:commandButton>
</div>
</apex:pageBlock>
</apex:form>
</apex:page>
Below is the code for Controller:
At that point I was like "gee if I could use Paging with the pageBlockTable tag" and then I decided to write it myself. So here is goes:
As we all know we should have two pieces of code, one for the Controller and the other is for the page tags.

The whole idea here is to create two lists on the controller object which one keeps the original records (all records) and the second one temporarily keeps only what should be shown to the user.
With defining a few parameters such as Total Pages, Current Page Number and Page size I managed to simulate paging successfully.
Here is what goes to the page:
<apex:page controller="MyPagingController" tabStyle="Account">
<apex:sectionHeader title="Accounts List with Paging"></apex:sectionHeader>
<apex:form >
<apex:pageBlock title="" id="pageBlock">
<apex:pageBlockButtons location="top">
<apex:commandButton value="View" action="{!ViewData}" id="theButton" rerender="pageBlock"></apex:commandButton>
</apex:pageBlockButtons>
<apex:pageMessages ></apex:pageMessages>
<div align="right" style="display:{!IF(NOT(ISNULL(accounts)),'block','none')}">
<font size="1pt">Page #: <apex:outputLabel value="{!PageNumber}"/> out of <apex:outputLabel value="{!totalPageNumber}"/> </font>
<apex:commandButton value="Previous" action="{!previousBtnClick}" disabled="{!previousButtonEnabled}" reRender="pageBlock"></apex:commandButton>
<apex:commandButton value="Next" action="{!nextBtnClick}" reRender="pageBlock" disabled="{!nextButtonDisabled}" ></apex:commandButton>
</div>
<br/><br/>
<apex:pageBlockTable value="{!accounts}" var="a" rendered="{!NOT(ISNULL(accounts))}" rows="{!PageSize}">
<apex:column >
<apex:facet name="header">Account Name</apex:facet>
<apex:outputLink value="/{!a.Id}" target="_blank">{!a.Name}</apex:outputLink>
</apex:column>
<apex:column value="{!a.Phone}"></apex:column>
<apex:column value="{!a.Fax}"></apex:column>
</apex:pageBlockTable>
<div align="right" style="display:{!IF(NOT(ISNULL(accounts)),'block','none')}">
<br/>
<font size="1pt">Page #: <apex:outputLabel value="{!PageNumber}"/> out of <apex:outputLabel value="{!totalPageNumber}"/> </font>
<apex:commandButton value="Previous" action="{!previousBtnClick}" disabled="{!previousButtonEnabled}" reRender="pageBlock"></apex:commandButton>
<apex:commandButton value="Next" action="{!nextBtnClick}" reRender="pageBlock" disabled="{!nextButtonDisabled}" ></apex:commandButton>
</div>
</apex:pageBlock>
</apex:form>
</apex:page>
Below is the code for Controller:
public class MyPagingController {
private List accounts;
private List pageAccounts;
private Integer pageNumber;
private Integer pageSize;
private Integer totalPageNumber;
public Integer getPageNumber()
{
return pageNumber;
}
public List getAccounts()
{
return pageAccounts;
}
public Integer getPageSize()
{
return pageSize;
}
public Boolean getPreviousButtonEnabled()
{
return !(pageNumber > 1);
}
public Boolean getNextButtonDisabled()
{
if (accounts == null) return true;
else
return ((pageNumber * pageSize) >= accounts.size());
}
public Integer getTotalPageNumber()
{
if (totalPageNumber == 0 && accounts !=null)
{
totalPageNumber = accounts.size() / pageSize;
Integer mod = accounts.size() - (totalPageNumber * pageSize);
if (mod > 0)
totalPageNumber++;
}
return totalPageNumber;
}
public MyPagingController()
{
pageNumber = 0;
totalPageNumber = 0;
pageSize = 20;
ViewData();
}
public PageReference ViewData()
{
accounts = null;
totalPageNumber = 0;
BindData(1);
return null;
}
private void BindData(Integer newPageIndex)
{
try
{
if (accounts == null)
accounts = [Select id, Name, Phone, Fax from Account limit 1000];
pageAccounts = new List();
Transient Integer counter = 0;
Transient Integer min = 0;
Transient Integer max = 0;
if (newPageIndex > pageNumber)
{
min = pageNumber * pageSize;
max = newPageIndex * pageSize;
}
else
{
max = newPageIndex * pageSize;
min = max - pageSize;
min = (min <>
}
for(Account a : accounts)
{
counter++;
if (counter > min && counter <= max)
pageAccounts.add(a);
}
pageNumber = newPageIndex;
if (pageAccounts == null || pageAccounts.size() <= 0)
ApexPages.addmessage(new ApexPages.message(ApexPages.severity.INFO,'Data not available for this view.'));
}
catch(Exception ex)
{
ApexPages.addmessage(new ApexPages.message(ApexPages.severity.FATAL,ex.getMessage()));
}
}
public PageReference nextBtnClick() {
BindData(pageNumber + 1);
return null;
}
public PageReference previousBtnClick() {
BindData(pageNumber - 1);
return null;
}
}

